Pyrography derived from the Greek pur – fire and graphos- writing has been around since fire itself. While there isn’t hard evidence, it’s quite likely that cavemen etched the walls of their caves with fire sticks. While today it’s primarily done on wood with a heated pen, it’s been done and continues to be done on leather, clay, and even gourds.
Pyrography artwork on Wood
Historically, it was used to decorate and brand various tools and musical instruments. Kitchenware or folk guitars were marked with a little bit of art both to convey the owner’s personality, and to distinguish their stuff from other people’s. It wasn’t really until the late Victorian era that the art form was taken up in earnest, and done on blank “canvasses” of wood and other materials rather than being a decorative embellishment.
In the early 20th century, soldering pens were developed, from which today’s wood burning tools were derived. This is a fun project for men, and even kids under adult supervision, of course. Luckily, the start up costs are cheap, and it’s an easy hobby to learn. If you enjoy it, woodburning can be the source of DIY gifts for the family for years to come!
Materials requires
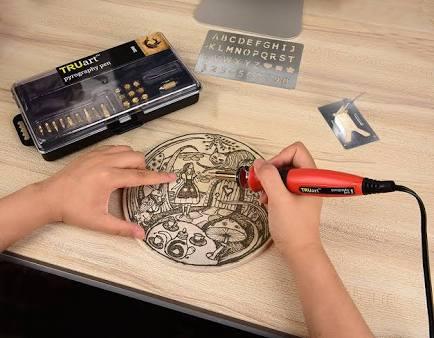
Pyrography tool kit
Woodburning supplies
- Woodburning pen: Quick note about the pen, you can start out with this one which is the Walnut Hollow Value Pen. The heat is simply on/off, and it comes with 4 tips. After that you can upgraded to the Walnut Hollow Versa Tool. It has variable heat control as well as a case for the various tips. It’s double the price, but still only $20! This is about as cheap and low-end as it gets, but has worked just fine for 6+ months. If you get really into pyrography, you can get pens that go into the hundreds of dollars.
- Carbon paper
- Tape
- Sandpaper
- Wet paper towel
- Design or artwork to woodburn
Get Familiar With the Tool
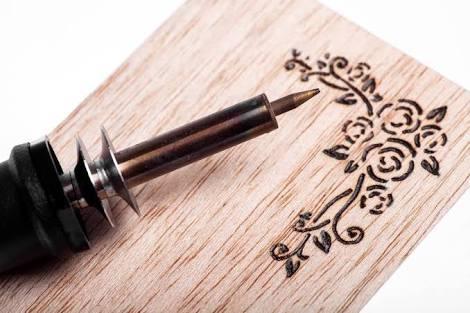
A woodburning pen is a very simple tool. It’s a pen-like device with a metal end through which heat is transferred to a removable tip. All but the cheapest models are variable temperature tools. With any kit, you will get 4-7 different tips for various methods of burning: straight lines, rounded lines, shading, etc. you will also get a metal safety stand for the pen so it’s never just sitting on a table or workbench.
The first thing you need to do, before working on any project, is to simply get familiar with the tool. Get a piece of scrap wood, plug in the woodburning tool and let it heat up for about 5 minutes, and test out “drawing” on the wood with the various tips just like you would with a pencil.
It’s that simple. Be sure to let the tool cool down for 5 minutes before changing out tips; it will then have to be heated up again for a few minutes. The key is to go slow and steady. If you’re jerky, it will show. If you go too fast, the wood won’t really burn like you want it to. Just like the tortoise, slow and steady wins the race.
Get familiar with the various tips.
The one on the left is the rounded tip it is probably the one That is used the most. On the right is the shading tip; you will notice it’s flat bottom, so that you can burn a larger surface area at one time.
A few other pointers to keep in mind:
I like to keep a wet paper towel on hand to wipe off the end of the tip every once in awhile as residue from the wood builds up. If you are getting a lot of smoke, the pen is too hot. Try turning down the heat for a smoother, smokeless burn. Be mindful of safety. The tip gets extremely hot several hundred degrees F, at minimum, in fact. So when the tool is plugged in, always be mindful of where the hot metal end is. Be sure it isn’t touching anything and always have it resting on the metal stand when not in use. When changing tips, use pliers wrapped in electrical tape, as the tips stay hot for a long time.

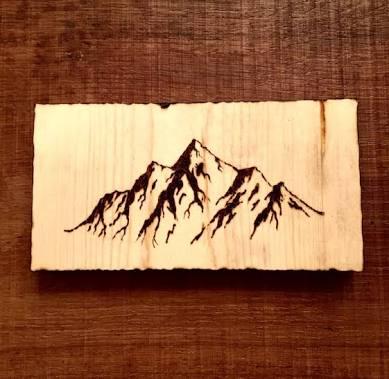
A Wood Burnt art piece
Choose a Design
The options are limitless for what you can burn onto a piece of a wood. You can work with basic, black and white designs, but as you get better, You sure Will get into more advanced shading techniques and what not. To find designs and patterns to work with, just google anything you’re interested in with “black and white illustration” added to the end: “mountains black and white illustration,” “wildlife black and white illustration,” “Minnesota Vikings black and white illustration.” you will more than likely get some great results to choose from.After you have picked a design, you want to figure out the size you want to use as well.
Find and Prepare the Wood
You can really use any wood for your pyrography project. Softwoods will burn at lower temps, while harder woods will take a very hot pen. The piece in the picture is pine very easy to work with. To prep your wood, if it’s a “raw” piece like this, you will want to sand it very well, and also decide which way you want the grain. It’s much easier to burn with the grain than against it. With my cabin project, it had more horizontal lines than vertical, so I kept the grain horizontal. You can also use pre-fab wood projects like boxes or pre-cut shapes that you can find at any hobby store. you will see later in the article how I used those. Anything pre-fab you buy at a hobby store will be very easy to work with, and you won’t have to worry about grain as much.
Affix Your Design to the Wood
Tape your cut out design a broad outline is fine as long as it fits on the wood to the carbon paper, and then to the wood.
Trace Your Design
Using a pen, firmly trace the outline of your design.After tracing, it should look something like this.
Burn the Outline
Get started! Using the pen, follow the carbon line you just traced onto the wood. Again, go with the grain as much as you can. Once the outline is complete. Now all that’s left is the shading.
Finish Shading and Complete the Project
Using the shading tip, carefully fill in the spots that need it, according to your design or creative brain. You can also stain the piece to give a nice sheen and finished look.

What do you think?